These pancakes start out looking soo innocent. It’s a trick.

Here’s where trouble comes in. Cue: chocolate maple syrup.

These pancakes start out looking soo innocent. It’s a trick.
Here’s where trouble comes in. Cue: chocolate maple syrup.
Have you realized yet that Valentine’s Day is, like, really soon? These handmade cuties will help you celebrate, whether or not you have a sweetie pie to get all mushy with.
Click on any photo to be directed to it’s Etsy listing.

…………………………………………………

…………………………………………………
Or biscuits.
Is there a difference? Do you eat one for breakfast and one for dinner?
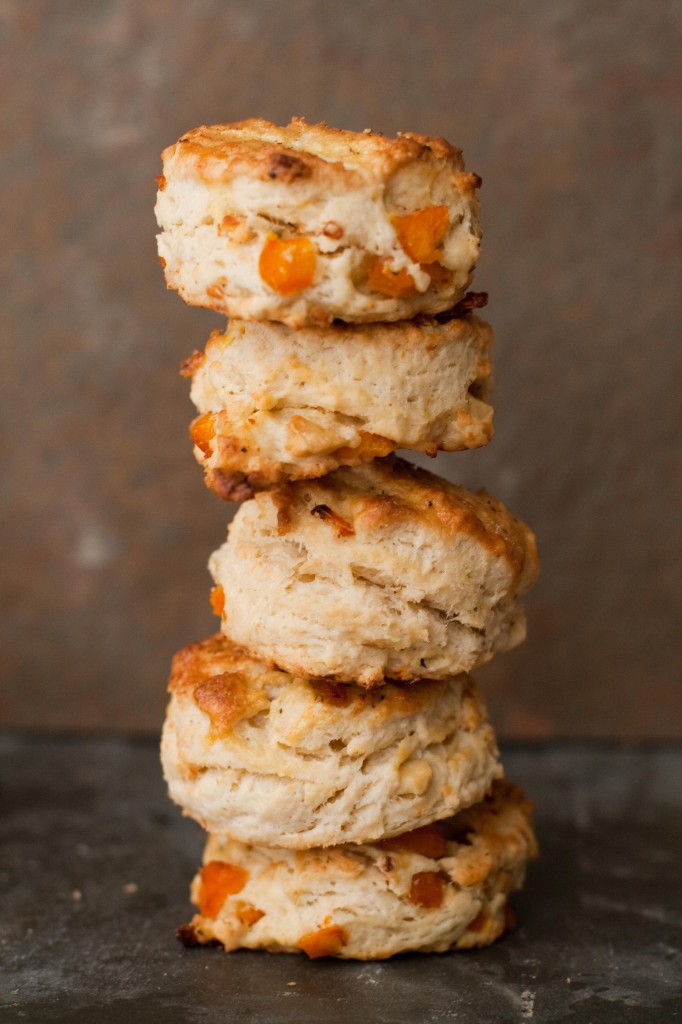
Who knows. Who cares. Their delicious buttery, flakey attitude about life masks my curiosities.
I needed something new to accompany the 10 gallons of chili left in our fridge. No more plain old bread or corn bread. That’s boring now. I had to get creative.
You guys. YOU. GUYS.
Today is National Peanut Butter Day.

Peanut butter happens to be my all-time most favoritest food in the world. It’s like this day was created so that for one day out of the year, I don’t have to feel guilty that I eat practically half a jar of peanut butter..um…everyday. How did I not even know it existed until yesterday!?
The new year calls for a new calendar.
I thought I wanted to be a graphic designer when I grow up, but after seeing all these super cool calendars I feel like I don’t have a chance out there in the real world.
(sigh) on to my next dream…
Click on any calendar to go to its Etsy listing!

I’ve come to realization that, for me, baking is a dangerous hobby.
I suddenly behave like the Hulk when I spot something with an insanely high sugar content, throwing people out of my way and breaking limbs off anyone trying to stop me from eating inhaling a whole pan of brownies. Mainly my husband. Really, only my husband. I give him credit for his efforts, though.
So when any item of insanely high sugar content happens to be a dozen warm oatmeal chocolate chip cookies straight out of the oven, there’s a good chance I’m eating them. All.
That’s why I’m going to post more real food. Not that cake isn’t real food, but I shouldn’t be eating it for dinner anymore.
This pea soup is so good it almost makes up for the fact that the only sweets we have in our house are 100 calorie trader joe’s chocolate bars. And there are only two left. What?

I almost didn’t make this soup with the ham hocks because, well, look at them. Animal parts freak me out. Bury them in the veggies as fast as you can so you don’t have to look at them for long.

If you don’t think you like pea soup, just give this a try. Smokey and salty, just like a pea soup should be. Just saute the veggies, throw everything else in, simmer, and puree. Don’t forget this fresh bread to go with it.

1 onion, diced
2 carrots, diced
2 stalks of celery, diced
1/4 cup olive oil
1 lb split peas
1.5 lbs ham hocks
1/2 teaspoon thyme
1/2 teaspoon marjoram
1/2 teaspoon sage (optional)
1 teaspoon salt
2 quarts liquid – veggie stock, chicken stock, water, or a combination
*For all the bacon lovers out there, this soup can also be made with strips of uncooked, smokey bacon in place of the ham hocks. Remove the bacon strips from the pot at the same time you would remove the ham hocks. In this case, you could garnish it with fresh bacon crumbles.
1. Saute veggies in a large pot or dutch oven in the olive oil until soft, about 5 minutes.
2. Dump in the peas, ham hocks, and spices. Mix it up a little. If you’re using broth because that’s what you have on hand, that’s fine but don’t add the extra salt unless you decide you need it later. Stock is unsalted, broth is VERY salted.
3. Add the stock. Bring this to a boil and then turn down the heat to simmer for 2 – 2 1/2 hours. If you’re in a rush, it only NEEDS to be cooked until the peas are done, about 30 minutes. The extra 2 hours just gives the flavors time to meld.
5. Take out the ham hocks and put aside to cool. Carefully blend 2/3 or all of the soup in batches in a blender. It’s up to your preference, a little chunky or not at all. An easy alternative to this cumbersome task is using a stick blender.
6. Once the ham is cool enough to work with, rip off any meat you can find.
7. Ladle the soup into bowls, either with the meat mixed in or served as a garnish!
Let’s be honest. Who the heck makes their own bread anymore?

Well, now I do. And you do too, soon. This stuff is SO easy to make and it’s WAY good.
I hated making bread at home; I would get so stressed out about the dough rising. Yeah, stressed. Like it’s the end of the world if my dough doesn’t rise.

But isn’t warm crusty bread one of the best things God has given us? I’d say it’s pretty close. Unfortunately, “crusty” is a totally gross word. Like “moist.” Are you with me? I do NOT feel comfortable using it to describe such a delicious food. But crusty is exactly what it is. Flakey, crispy, crusty crust with chewy, soft insides. I’m practically drooling even though I just ate half the loaf.
“It just takes so much work” you say?
This bread changes everything. Did I mention it’s easy? The directions are wordy but they’re like a chapter out of “Crusty Bread for Dummies.” If that existed. Simple. Foolproof.

I think you’ll agree it’s awesome that I have this Ziploc of dough in my fridge to make bread whenever. I. want. Make the dough up to 7 days before you need a fresh loaf of bread and you’ll have the best companion for soup, period.

A word on yeast: You’ll find “Instant Yeast” and “Dry Active Yeast” on the shelf at the grocery store. Instant yeast acts more quickly and can be tossed straight in with the flour when mixing (as with this recipe). Dry active yeast is traditionally mixed with the warm water before mixing with the flour. I’ll tell you a secret. I just threw dry active yeast into this recipe without “activating” it in water. Still worked.
Thanks to King Arthur Flour
Yield: 3 or 4 loaves, depending on size. You can bake them over the course of a week.

3 cups lukewarm water
6 1/2 to 7 1/2 unbleached all-purpose or bread flour
1 tablespoon salt
1 1/2 tablespoons instant yeast
*If you measure flour by sprinkling it into your measuring cup, then gently sweeping off the excess, use 7 1/2 cups. If you measure flour by scooping your cup in the bag, then sweeping off the excess, use 6 1/2 cups. Most accurate of all, and guaranteed to give you the best results, if you measure flour by weight, use 32 ounces.
1.Combine all of the ingredients in a large mixing bowl, or a large (6-quart), food-safe plastic bucket. For first-timers, “lukewarm” means about 105°F, but don’t stress over getting the temperatures exact here. Comfortably warm is fine; “OUCH, that’s hot!” is not. Yeast is a living thing; treat it nicely.
2. Mix and stir everything together to make a very sticky, rough dough. If you have a stand mixer, beat at medium speed with the beater blade for 30 to 60 seconds. If you don’t have a mixer, just stir-stir-stir with a big spoon or dough whisk till everything is combined.
3. Next, you’re going to let the dough rise. If you’ve made the dough in a plastic ice cream bucket, you’re all set — just let it stay there, covering the bucket with a lid or plastic wrap; a shower cap actually works well here. If you’ve made the dough in a bowl that’s not at least 6-quart capacity, transfer it to a large bowl; it’s going to rise a lot. There’s no need to grease the bowl, though you can if you like; it makes it a bit easier to get the dough out when it’s time to bake bread.
4. Cover the bowl or bucket, and let the dough rise at room temperature for 2 hours. (If you’re pressed for time, skip the room-temperature rise, and stick it right into the fridge).Then refrigerate it for at least 2 hours, or for up to about 7 days. The longer you keep it in the fridge, the tangier it’ll get; if you chill it for 7 days, it will taste like sourdough. Over the course of the first day or so, it’ll rise, then fall. That’s OK; that’s what it’s supposed to do.
5. When you’re ready to make bread, sprinkle the top of the dough with flour; this will make it easier to grab a hunk. Grease your hands, and pull off about 1/4 to 1/3 of the dough — a 14-ounce to 19-ounce piece, if you have a scale. It’ll be about the size of a softball, or a large grapefruit.
6. Plop the sticky dough onto a floured work surface, and round it into a ball, or a longer log. Don’t fuss around trying to make it perfect; just do the best you can.
7. Place the dough on a piece of parchment (if you’re going to use a baking stone); or onto a lightly greased or parchment-lined baking sheet. Sift a light coating of flour over the top; this will help keep the dough moist as it rests before baking.
8. Let the dough rise for about 45 to 60 minutes. It won’t appear to rise upwards that much; rather, it’ll seem to settle and expand. Preheat your oven (and baking stone, if you’re using one) to 450°F while the dough rests. Place a shallow metal or cast iron pan (not glass, Pyrex, or ceramic) on the lowest oven rack, and have 1 cup of hot water ready to go.
9. When you’re ready to bake, take a sharp knife and slash the bread 2 or 3 times, making a cut about 1/2″ deep. The bread may deflate a bit; that’s OK, it’ll pick right up in the hot oven.
10. Place the bread in the oven, and carefully pour the 1 cup hot water into the shallow pan on the rack beneath. It’ll bubble and steam; close the oven door quickly.
11. Bake the bread for 25 to 35 minutes, until it’s a deep, golden brown.
12. Remove the bread from the oven, and cool it on a rack. Store leftover bread in a plastic bag at room temperature.
Well…it’s been longer than I thought.
Time has been absolutely FLYING.
Life changes include: moving to madison, buying a home, adding another dog to our crazy lives.
Penny needed a friend, OKAY?!
Half the time, they’re friends.

The other half, Penny hates Oscar.

We’re still working on the friendship.
Since I’m an etsy junkie, and I want you to be too, I’m going to feature an Etsy shop owner each week. If you’re unfamiliar with Etsy, it’s an online marketplace of all things handmade. Go ahead. Click on this. Prepare to browse all. night. long.
Today I’m sharing the work of Nikki Ross, owner of N(star)Studio. I am in LOVE with these mugs I bought at a craft fair in Madison.

It looks like she doesn’t have any for sale in her shop, but she has a mug with a handle or I’m sure you could request a few of these as a custom order. She has the cutest nesting bowls that I might scoop on.
I encourage you to get on Etsy and explore what it has to offer to you. There is SO much talent out there and I value each item I buy handmade because I know how much time and creativity went into it. They’re one-of-a-kind too! Impress your friends, buy handmade.
Get every new post delivered to your Inbox
Join other followers
